• Skip to primary navigation
  • Skip to main content
  • Skip to primary sidebar

Shower Redefined

Redefine your Shower Experience

  • Home
  • Blog
  • Review
    • Cleaner
      • Glass Shower Door Cleaner
      • Shower Cleaner
      • Drain Cleaner
    • Shower Head
    • Toilet
  • Contact Us
  • About Us
  • Show Search
Hide Search

Blog

How to Make a Toilet Flush Better

August 25, 2018 By Mark Benett

How to Make a Toilet Flush BetterMany people wonder how to make a toilet flush better. But how do you actually do it if you have no previous experience?

Slow flushing toilet can be a nightmare for someone, especially if you have a big family. During the morning rush hours, slow flushing toilet can make you waste time.

You will be wasting your time and time of every family member in your household.

Every toilet differs in things. However, the principle is the same.

You don’t need to be a plumber to be able to understand how your toilet works. Neither to learn how to make your toilet flush better.

In this post, you will find everything necessary that will help you fix your slow flushing toilet.

Why Would You Need to Get Your Toilet Flush Better?

There are many reasons to getting your toilet flush better. Being annoyed by waiting is just one of them.

It’s true that slow flushing toilet can waste your time and waste time of everyone in your family. It can even make you be late for work.

Regardless, slow flushing toilet can cause some other problems as well. If your toilet isn’t flushing properly, it might not get enough of water in the toilet bowl in needed time.

If the toilet isn’t flushing quickly enough, it might not be able to completely dispose of human waste. You would need to flush your toilet twice or maybe even three times then. Flushing toilet more times won’t only make you wait for the water tank to refill. You will also waste more water which results in higher water bill at the end of the month.

There is absolutely no reason to waste neither your money nor your time. It’s time to come to an end with slow flushing toilets.

What Are the Reasons for Slow Flushing Toilet?

It’s most likely that you’re having a slow flushing toilet problem. Slow flushing toilet can’t efficiently dispose of human waste as it should.

Since toilet is made from three most important parts, the problem can be in either one of them. If you aren’t familiar with toilet parts, there’s no reason to worry. We will keep it simple so everyone can understand.

The three main parts of every toilet are the toilet bowl, the water tank, and the mechanism.

Water Tank Problem

The most common reason why your toilet isn’t performing at the wanted flushing speed is simple. It is the water tank. The mechanism inside the toilet water tank is constantly in water. Therefore, it has its limited lifespan. If something from the mechanism isn’t doing its job properly, it’s a problem. Slow flushing toilet problem might occur.

Release Valve Clogging

Another reason might be the release valve where the water flushes to your toilet bowl. Whenever you press the flush button on your water tank, the valve releases the water that is inside the water tank. If it’s blocked, or not opening properly, the water might be going out slower than it should.

How to Make a Toilet Flush Better

There is no one way to make your toilet flush better. As mentioned before, it’s most likely that toilets differ from model to model. But also, not everyone might have the same problem.

1st Step: Locate the Problem

Before you even make your toilet flush better, it’s important to find the cause of the problem. Most likely that it’s going to be inside the water tank. Although it is a problem, it’s still easily solvable.

2nd Step: Clean Your Toilet Regularly

In my opinion, the best way to find the cause of the problem would be by cleaning your toilet. As you are cleaning your toilet, you will most likely come across the problem. You might even eliminate the problem as you clean your toilet without even knowing.

The toilet should get cleaned at least once a week. If it’s not done at least once a week, the water inside the water tank might leave calcium. Also mineral build up that comes from the tap water. Such buildups can slow the flushing speed, but also create a number of other problems.

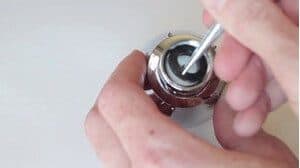
3rd Step: Improving the Water Capacity

However, sometimes, only some improvements are necessary.

Inside the water tank, you have the ability to change the capacity of water inside it. It can simply be done by lifting up the water level bar inside the water tank to another level. Most of the new water tanks have the ability to raise the water capacity.

Raising your water capacity inside the water tank is a great solution. You will be flushing more water into your toilet bowl. The more water there is, the heavier impact will be. Therefore, your toilet flushing speed will improve.

If you are unsure how to change the capacity of water in your water tank, take it slow. It’s the best to find the manual or look up online your water tank model.

You can also watch below video for better understanding

Things to Avoid When Improving the Flushing Time of Your Toilet

The thing you should definitely avoid is to mess with other components inside your water tank.

I don’t recommend you take the mechanism of your water tank apart, for example. But you can look around and see if there’s anything causing the problem.

Also feel free to change the water tank volume. That’s something manufacturers have made available for all users to do themselves.

Never leave toilet cleaning products for too long inside the water tank. Otherwise, it might weaken the material of your water tank and its mechanical parts.

Conclusion

If you come to the point where you need to look for solutions, stay calm. Look for various solutions and you will make it work.

You don’t need to replace your toilet whenever you experience a problem. However, we agree that it can be really frustrating, time-wasting, and annoying.

There are many reasons why your toilet flushing speed is not the best. There are also many different ways to fix it. If you follow the post, you will be able to understand what to look for, and how to actually fix it.

How slow is your toilet flushing? Did you do something about it already?

Filed Under: Blog, How to

How to Remove a Flow Restrictor from a Shower Head

July 21, 2018 By Mark Benett

How to Remove a Flow Restrictor from a Shower HeadInstalling a flow or water restrictor is intended to control the water flow in your shower head to less than 3 gallons per minute.Some regulators stipulate their use to help reduce water wastage in the shower.While the flow restrictor helps reduce flow to save energy and water, there may be challenges.
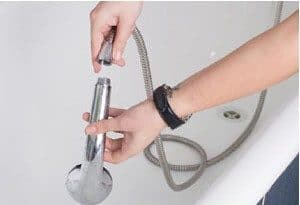
If the water pressure in your area is generally slow, a flow restrictor will slow down your flow even greater. Hence, you may need to take it out.Bear in mind that when you remove the flow restrictor, your water use may increase and escalate your monthly bill.

How do I locate the restrictor?

Check behind the metal piece in the shower head. It has a circular, flat, star-shaped design. The restrictor is the plastic part that covers the shower head inlet.They may come in colors and have slim, open inserts close to the edges.

Here are your tools:

Adjustable wrenches ,Paper clip,Towel or cloth,Plumber’s tape,Needle-nose pliers and Screwdrivers

Disconnect the shower arm from the tap

  • Use a wrench and detach the shower head from the arm.
  • Protect the parts from scratches or damage with a cloth, towel or masking tape.
  • Wrap the cloth around the parts and turn until it comes loose.
  • Look for the connection from the arm that’s attached to the wall.
  • Unfasten the ball joint inside the shower head with a wrench.
  • Remove the shower head from the arm.

Troubleshoot:

Apart from the flow restrictor, there are other areas than you need to check.If hot water runs through your shower head, examine the water heater for any issues that may also restrict water flow.

Sediment can build up in the water heating.

Make a full flush of the hot water system to remove any buildup.

Studies suggest you may install a water softener to help reduce sediment or replace the anode rod regularly.

Remove the gasket and screen:

Turn the shower head over and take out the gasket. The screen is attached to the inlet of the handle or shower head.

  1. Straighten the end of a paper clip and poke it around the gasket or O-ring inside the shower head.
  2. If it doesn’t come loose, try to pry it out with a screwdriver.
  3. Remove the gasket and protect it from any damage.If it is damaged, replace it with a new one.
  4. Examine the shower head and take out the screen if there’s one.
  5. Give the shower head a few knocks to dislodge the screen. If it stays in place, take it out with pliers.

How to clean the screen:

Take the screen; place it under the tap and let the water run on it. The water will help clear away any dust or sediment.

  • Position the paper clip under a part of the restrictor.
  • Twirl it and lift it up to take out the flow restrictor.
  • You can also use a screwdriver or pliers to help pry it out.

Put the shower head back together:

  • Put the gasket inside the shower head and slip it back into position.
  • Re-install the shower screen inside the shower head.
  • Unwind the plumber’s tape from the threads around the shower arm.
  • Apply some fresh tape around the shower arm threads.
  • Use a wrench to fasten the head connector onto the shower arm.

What if my restrictor is in the handheld shower?

To remove the restrictor from the handheld fixture:

  • Check the instructor’s manual to help locate the restrictor.
  • Look inside the part that connects shower arm or at the edge of the handle which attaches the flexible tubing.

How to remove the restrictor

First, unfasten the restrictor.

If the restrictor is at the edge of the handle:Wrap the connections with a cloth. Take hold of the nut with pliers. Turn it to the left to unfasten and take out the handle form the tubing.

Take out the washer

  • Uncover the restrictor.
  • Next, use the pliers and take out the washer within the handle and the filter screen.
  • Remove the restrictor with a screwdriver.
  • Now that the restrictor removed from the handheld shower, it’s a good idea to keep it working well.

How to help improve water flow in the handheld shower

Apart from replacing the water restrictor, you can help maintain the water flow in your shower head.It’s a good idea to make regular maintenance checks on our handheld shower.A regular maintenance schedule will lend support to the restrictor.

The process:

  • Reduce buildup in the handheld shower.
  • Keep the rubber tips on the shower head clean.
  • Minimize water spots around the handheld shower.

1.Treating buildup in the handheld shower

  • Detach handheld shower head from the connecting hose.
  • Let the fixture rest in a vinegar and water solution for a few hours or overnight.
  • Rinse away any sediment and dry it with a cloth or towel.

2. Treating the rubber sprays

Brush away any sediments around the hand held shower with a soft cloth or by hand.

3. Treating water spots

Rinse the handheld shower head with warm water.Dry it and reinstall it.

What if my restrictor is inside the holder?

Tools:
  • Pliers
  • Pipe wrench
Process
  • Wrap a towel or rag around the connections and the shower arm.
  • Use a pipe wrench to grip the shower arm and the pliers on the nut.
  • Turn the nut to the left until the holder comes loose from the arm.
  • Use the pliers to take out the washer and filter screen from the end of the holder.
  • Detach the restrictor with a screwdriver.

Re-connect the parts:

  • Put the filter screen back into the washer.
  • Secure it in place with a twirl of the finger.
  • Peel away any worn plumber’s tape from around the threads.
  • Apply some fresh tape to the shower arm, twisting it to the right.
  • Fasten the connector to the threads by hand.
  • Place a cloth over the nut and tighten it with a wrench.

You can also watch the below video for more information

Conclusion:

A water flow restrictor is used to help reduce water wastage by controlling the amount of water in the tap.Removing the restrictor may increase water flow, as well as energy usage and costs.Follow all instructions. Locate the restrictor and check other areas that might affect water flow. Remove it, reassemble all parts and allow your flow to increase.

Filed Under: Blog, How to

How to Remove a Shower Head

July 7, 2018 By Mark Benett

How to Remove a Shower HeadDid you notice you’re not getting enough water coming through your shower head lately? It could mean you need to install a new one.

A shower head is a nozzle that attaches to the shower arm. It sends water into the shower or tub through perforated holes along its base.

Calcium, mineral deposits or rust will build up, block the holes in the shower head and retard water flow. Then the first question what comes to your mind is how to remove a shower head.It’s not the easiest task, so we will walk you through the process to keep it simple.

Your tools and materials:

  • Pliers
  • Wrenches
  • Center punches
  • Mallets
  • Wire brush
  • Cloth or Sponge
  • Blankets, towels or sheets
  • A small basin

The Process:

Try to slacken the shower head using any of the above tools as needed.

Next, apply some heat to help dissolve the mineral deposits and rust.

Apply some lime scale remover to help clear the buildup.

Add some form of lubricant to work deep into the nuts and bolts to help loosen the shower head.

Step 1: Find the problem

Before you remove your shower head, find out why it’s stuck in the first place.If the shower head doesn’t come loose with your hands, do the following:

  • Check around the shower head for signs of discoloration. If there are copper or orange- like marks, there’s rust present.
  • If you see a white ring around the shower head, there’s mineral build-up.

When none of the above is present, chances are, the connections may be too firmly attached.

Step 2: Shut off the water source

If you’re finding it hard to remove your shower head, you’ll need to switch off the water supply.

To locate the valves: search under the bathroom vanity or space directly beneath your tub.

Step 3: Prep your work area

Have a cloth or towel handy to help keep small plumbing parts safe and retrievable. Cover the floor or tub to prevent defacing your shower with chemicals or tools.

Step 4: Take out the shower head

You have a range of tools to help you get the job done.

  • Start with pliers or wrenches. If it’s still stuck, try each tool until you get the right fit.
  • Cover the plumbing parts with a cloth or towel to help minimize scratches or damage.
  • Take a firm hold on the connector or bolt with a wrench or pliers.
  • Turn the tools to the right to help break up the limesacle or rust.
  • Next, turn the tools in the opposite direction to help loosen the shower head.

Step 5: Treat the problem

  • Once the shower head comes off, it’s time to treat the problem.
  • Treat the buildup or rust with a cleaner to help loosen the connections.
  • Apply the cleaner according to the instructions given.
  • Give the product some time to penetrate the shower head.
  • Use a wire brush to scour off the buildup.
  • Wipe away excess material with a cloth or sponge.

Step 6: Lubricate the shower head

Mineral buildup can make it difficult to remove your shower head. You may need a strong penetrating lubricant to help.

Products like Liquid Wrench or WD-40 may help take some of the muscle out of your work.

  • Follow the instructions ad apply the product to the connections.
  • Give it some time wot work through the buildup.
  • Apply another layer of lubricant and let it sit for a few more hours.
  • To loosen, cover the parts with a cloth to get a firm grip.
  • Use a wrench and start to loosen th shower head.

Step 7: Clean the shower head

Now the shower head is off; it’s time to clear away the buildup.

  • Place the shower head in a small basin and cover it with some white distilled vinegar.
  • Make sure the vinegar covers the shower head.
  • Let theproduct penetrate. You can leave it overnight if needed.
  • Hold the shoer head under the tp and wash away the buildup.

Step 8: Troubleshoot

If traces of buildup or rust remain after the vinegar solution, here’s what to do:

  1. Use a limescale or rust remover product to the shower head.
  2. Follow any instructions to avoid damage.
  3. Let the product penetrate for some time before scrubbing.
  4. Work the rust and buildup out with a wire brush.

Step 9: Clean the threads

When you take off the shower head, you’ll notice pieces of plumber’s tape, limescale or rust around the threads.

Always clean your shower arm before re-connecting the shower head.

  • Strip off the tape from around the arms of the thread. A utility knife or wire brush can help.
  • Use some limescale remover to loosen any rust or buildup.
  • Give the cleaner time to penetrate before scrubbing.
  • Work the area with a wire brush to help loosen and remove calcium, rust or mineral deposits.
  • Wipe the arm clean with a cloth or towel.

Step 10: Reattach the Shower Head

Apply some fresh plumber’s tape around the threads in the shower arm to reduce leaks. You can use teflon tape as well to seal the threads.Turning to the right, wind the tape around the threads on the shower arm.

Make about three layers and press them firmly into place.

Step 11: Connect the Shower Head to the Arm

After the shower arm is clean, attach it to the head.

For a basic shower head:

  • Position the shower head onto the threads on the shower arm.
  • Turn the parts to the right until they are tight.
  • Attach the end of the hose mounts to the end of the opposite shower head.
  • Fasten the parts by hand.
  • Put the shower head on the mount.

Step 12: Test it out 

When the shower head is in place, check for any possible leaks.

  • Turn on the water and let it run.
  • Check to see if there is leaking from any of the connections.
  • If there are leaks, re-fasten the connections until leaking stops.
  • Apply additional tape if necessary.

If you want to know more then you can watch below video

Conclusion:

Bath time is a welcome relief. You want a steady flow of water every time you step into the shower.Hard water buildup can block your shower head and reduce water flow.

Follow all guidelines.Work step by step to remove the buildup.

Clean the shower head and put it back into place.In no time, you can have a clean, bright shower head in place.


Filed Under: Blog, How to

How to Clean Fiberglass Shower

June 10, 2018 By Mark Benett

How to clean fiber glass shower
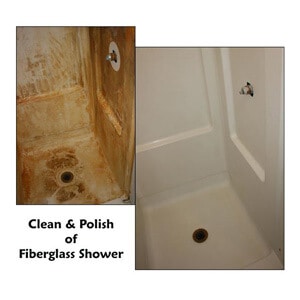
Fiberglass showers are noted for their glossy appearance and high durability.

Fiberglass is an inexpensive alternative to porcelain. However, soap scum and hard water deposits can make it look grungy and unkempt.

Fiberglass is not as sturdy as ceramic or porcelain. It’s sensitive to deep scouring that may cause permanent scratches.

Studies recommend using chemical-free, non-abrasive, more natural methods.

How to Clean Fiberglass Shower: 4 easy steps

1. Use non-abrasive cleaning products:

  • Dish washing liquid
  • Laundry detergent
  • All-purpose household cleaners made for use with fiberglass

2. Set up a Cleaning Program

While your monthly cleaning is standard, a regular once-over between scheduled cleaning will help keep build-up at bay.

  • After daily use, wipe down the shower with a squeegee or microfiber cloth. It helps reduce moisture and repels mold and mildew build-up on the fiberglass.
  • You can also let a fan blow on the shower to help the moisture to evaporate.
  • Have a spray bottle of vinegar on hand to help disinfect and deodorize the shower after each use. The vinegar will retard bacteria growth, and reduce the need for hard scrubbing.

3.Protect the Fiberglass

Fiberglass can stain easily. It’s best not to store bath items on the floor of the shower that may cause dirt rings to form. Studies recommend installing a shelf or caddy to help keep shower items tidy. 

Scratch Prevention:

Fiberglass comprises small fragments of glass fused into a solid surface. It will, therefore, scratch easily if scrubbed harshly.

Choose cleaning materials made with:
  • Polyester
  • Nylon
  • Polyethylene
  • Sponge
  • Non-scratching brushes

4. Minimize Bacteria Build-up

Bath items like shower curtains, rubber toys and accessories can cause bacteria to form where they touch the fiberglass.

Before you start cleaning, take down the shower curtain and remove any toys and accessories.

Clean them in a vinegar solution before re-installing.

How to clean fiberglass shower: Natural Methods

  • Soft scouring pads
  • Microfiber Cloths
  • Sponges
  • Squeegees
  • Spray bottle white vinegar
  • Lemon juice
  • Peroxide
  • Household bleach
  • Old toothbrush
  • Borax
  • Baking Soda

 As with any cleaning regimen, wear a pair of gloves to protect your hands and skin.

     1. Vinegar and baking soda

They are two natural, inexpensive cleaners that help keep fiberglass clean. Very gentle, and won’t scratch the shower surface. They work well to clean, disinfect and deodorize your shower.

Methods:

  • Mix the vinegar and baking soda to a paste.
  • Place it around the shower and wipe the walls with a cloth or toothbrush.
  • Rinse the area after scrubbing and wipe it dry, or
  • Spread the baking soda around first, then spray on the vinegar and rub in the usual way.
  • For tougher marks, let the solution sit on the shower walls for as long as possible to help break down marks.
  • Rinse well afterward.

You can see below video for more information

      2. Peroxide

Peroxide is another natural cleaner that is an effective stain remover. For hard-to scrub stains on fiberglass, add a few drops of peroxide to the baking soda or vinegar.

  • Mix two parts baking soda to 1 part peroxide.
  • Put the mixture on a cloth or sponge and smear it on the shower walls. Leave it in the shower for a while to help dissolve the stains.
  • Wipe the area clean and dry it thoroughly.

      3. Borax and Lemon

Lemon is long known as a potent cleanser, and borax is an old-aged name in cleaning. The two combined can help reduce staining on fiberglass. A mixture of borax and a few table spoons of lemon juice will work.

       4.Household Bleach

A solution of household bleach and water can help get rid of tough stains left by grime, mold, and algae.

Method:

  • Mix equal amounts of bleach and water in a spray bottle.
  • Spread it on the areas and let it sit for a while.
  • Work the solution into the surface with a sponge or microfiber cloth until the marks begin to disappear.
  • Rinse and wipe clean and dry.

How to Clean Hard Water Stains:

Bath water can cause stains and limescale to accumulate on fiberglass. It’s recommended to use a product that can remove mineral deposits. Some items include:

  • Zud:

Zud contains soft, non-abrasive, easy to use, all-purpose household cleaner. It also contains oxalic acid that is good for removing rust from surfaces. It helps remove mineral deposits and cleans and shines surfaces with little scrubbing effort.

Method:

Sprinkle around the shower; rub with a damp cloth until the surface is clean. Wipe the area dry.

  • CLR:

Calcium, Lime and Rust Remover (CLR)help remove limescale, mineral deposits,and rust from shower surfaces.

Method:

  • Combine equal parts water and CLR with warm water.
  • Test a small patch of the fiberglass before spreading it on the entire
  • Apply it directly on unsightly marks or place it on a sponge or cloth.
For hard to remove stains:
  • Apply CLR full-strength to the affected areas.
  • Do not let it sit for too long.
  • Wipe down the shower, rinse and dry thoroughly.
Caution:

To avoid toxic fumes, open any windows and the bathroom door to allow air to circulate.

Always wear gloves. To avoid slipping, do not use CLR on the shower floor.

  • Lime Away:

Line-A-Way cleaner helps remove limescale, rust and mineral deposits from surfaces. Use in your fibreglass showers to keep build up to a minimum.

Method:

Spray on to the shower and wipe with a cloth or sponge. Wipe and dry the fiberglass to a good shine.

Commercial Cleaning:

If there are tough stains or large deposits of mold and mildew, it’s best to get a professional to tackle the problem.

Re-Conditioning:

Studies recommend twice-yearly conditioning to help keep your fiberglass shower free from scratches.

  • Use a cream wax or automotive polishing formula to shine fiberglass.
  • Place a small amount of wax or polish on a cloth or sponge and work it into the surfaces.
  • Wipe clean and dry the entire area.
Caution:

To avoid slipping from waxy products, only apply to the shower walls and not the shower base.

Conclusion:

Your fiberglass shower can last for years if kept consistently clean and bright. A regular cleaning regimen will help keep it sparkling and attractive. Use natural, non-abrasive cleaners and scouring materials.  If all else fails, get professional help.


Filed Under: Blog, How to

How to Clean Glass Shower Doors

June 6, 2018 By Mark Benett

how to clean glass shower doorsLet’s face it! Glass doors in your shower can give your bathroom a sleek, modern look, but may be hard to keep clean.

Constant showering will cause soap scum build-up. Hard water stains, mildew, mineral deposits and dead skin cells will cause your doors to appear cloudy.

With a tight schedule, keeping shower doors clean can be a chore. In a few easy steps, we can show you how to cope.

So how to clean glass shower doors and keep it like new

Set up a Cleaning Regimen

  • To help minimize build-up on your shower doors. Schedule a cleaning program that can keep them looking great every time you step into the bathroom.

There’s an array of cleaning products available to help keep your shower doors clean.

Points to Consider:

  • Your choice will depend on your preferences.Exposure to some chemicals may cause allergic reactions to yourself our others.
  • You may opt for other natural methods which we will explore as we go along.
  1. Practice Daily Cleaning

Make it a habit of giving the doors a once-over after you shower.

While it may seem unrealistic for some, it only takes a few extra minutes.

Timely Tips:

  • Daily wipe downs will help lessen build-ups and reduce harsh, weekly or monthly cleaning.
  • After you shower, take a cloth or towel and wipe the doors dry. It will reduce water stains on shower doors.
  • Use the heat and steam immediately after showering to help break down soap scum as you scour the surface.
  • Leave the shower doors open to allow the water and mist to evaporate.
  1. Reduce the use of Solid Soap

Soap scum build-up is one of the significant causes of cloudy shower doors. If left unchecked, it can be hard to remove.

Some natural soaps may contain ingredients like paraffin and talc. They can contribute to the problem.

 You can opt for:
  • Natural soaps with fewer inorganic ingredients
  • Liquid s
  • oap that may be more compatible with hard water

Some shampoos and body washes may contain oils that can cloud up shower doors. Opt for more natural products, which work better with hard water.

  1. Minimize Streaks and Scratches

  • Use soft materials like microfiber cloths or sponges to minimize scratching between cleaning.
  • After you wipe the doors down, finish it with a splash of spray cleaner of your choice.
  • Clean your rags after each use to avoid dirt and mold build-up. You can launder them in the washing machine as well.
  1. Take care of Cracks and crevices

One of the areas of concern in the shower is the unsightly trail of soap and mildew stains around the door tracks.

Some studies suggest filling in any spaces in the door track. One study recommends using vinegar.

Apply the vinegar for as long as possible, even overnight if necessary. Wipe it clean, and watch it sparkle.

  1. Monthly Deep Cleaning

In spite of good intentions, we may miss the daily routine because of other priorities. Don’t despair; you can still make up for lost time.

Your monthly clean may be a bit more intensive, mainly if the daily regimen falls by the wayside. It means you may have more grime and soap scum to clean up.

 Do-it-Yourself Tips:

You can do the job yourself if you have the time. Schedule a professional cleaner for excess build-up.

For your safety: 

  • Gloves will keep your hands and skin away from chemical spills.
  • Choose the best materials and products to help remove harsh stains and soap scum. 

Here are some choices:

 Chemical Solutions and Materials:

While most chemicals will help remove the gunk from your shower door, some toxic substances may affect your lungs or cause allergic sensitvity.

 Squeegees:

Squeegees work similar to the windshield wipers on your vehicle. The rubber blade helps erase water stains from glass surfaces.

They may be available in stainless steel and can store easily by attaching the suction cup to the bathroom wall.

Microfiber Cloths

Some studies recommend the micro-fiber cloths to get at tight areas like around edges and under the door handles.

They are super absorbent and non-scratching.The fibers reduce build-up and streaking and are ideal for drying and polishing.

Magic Erasers

Magic eraser sponges are affordable, lightweight and non-abrasive.

  • They get between hard-to-reach areas and grooves, to remove dirt and grime between crevices and cracks.
  • The scouring action helps remove mold, soap scum, stains, and mildew.
  • They also reduce fogging on shower doors.

How to Use:

Dampen the sponge lightly with water.

Use gentle strokes and work the area until it is clean.

Wipe the surface with a wet cloth to remove any remaining residue.

Dryer Sheets

Oh yes! Believe it or not, dryer sheets can help remove stubborn soap scum build up on your shower doors.

Hard water stains and calcium deposits make the glass cloudy and dingy. They will clean, minimize streaks and help restore shine.

How to Use:

Slightly dampen the dryer sheets and watch your shower doors come alive with sheen and fewer streaks. They will have your shower smelling fresh as well.

 Barkeepers Friend

While Barkeepers Friend is a multi-purse kitchen cleaner, it can be used in the shower as well.

It’s a gentle cleaning powder that can make quick work in reducing soap scum build-up and promoting shine.

 How to Use:

Put the powder directly onto the glass or add it to a damp sponge or cloth and scrub the doors.

Wear your gloves toprotect your skin.

Krud Kutter

Get rid of soap scum, mold, stains, and mildew from shower doors with Krud Kutter.

  • KrudKutter is a concentrated cleaner.
  • It’s a streak-free option to keep your shower doors looking like new.
  • It’s also ammonia-free and will not damage the glass doors.

How to Use:

Spray it on or use it with a damp cloth.

Wipe the doors until the build-up dissolves.

Shine with a clean cloth.

Tilex:

Tilex is a householdname in cleaning products.

  • The shower cleaner is said to be mild and will help lift soap scum, mildew, and stains from shower doors.
  • The ingredients in Tilex act as a solvent to loosen stins and mineral deposits.

How to Use:

According to instructions, spray on Tilex to shower doors and leave it to do its work.

You can leave it on, no need to wipe away. It’s ideal for daily use to help reduce build-up.

 Natural, Biodegradable, or Non-toxic Options:

Non-toxic, biodegradable products help clean without the risks of exposure to harsh chemicals.

Here are some of the benefits:

  • Save money
  • Protect the environment
  • Reduce allergic sensitivity

Vinegar

  • It is long used as a household cleaner. The acetic acid acts as a solvent and helps break up mineral deposits.
  • It’s a good product for cleaning glass and unclogging drains. Vinegar is relatively cheap when compared to commercial products.
  • Vinegar works well on the glassbecause it does not streak, so yourdoors stay bright and clean.
  • Studies recommend you dilute the vinegar with water to minimize damage from the acid.

Method:

  • Mix equal parts vinegar and water. You can use the spray-on method from a bottle or wipe with a cloth.
  • Dampen a clean cloth and wipe the surfaces.
  • Rinse with warm water.
  • Repeat the process if necessary.
  • For hard to move build-up, use the undiluted vinegar.
  1. Baking Soda

Baking Soda is another cheap but non-toxic option to clean shower doors.

It is non-abrasive and gentle on surfaces.

It neutralizes stains and odors and freshens surfaces. 

Method:

Sprinkle baking soda on the surface, onto a damp cloth or make a paste with water.

Work the area until stains are gone.

Wipe clean with a fresh towel or sponge.

  1. Hydrogen Peroxide

Peroxide is another alternative to commercial cleaners.

  • It’s proven to be less harsh than bleach,and it’s a good option for cleaning shower doors.
  • Peroxide is a natural antiseptic and stain remover.
  • It will help dissolve mildew, dirt, and mold that may accumulate around the shower door frame.
  • The ingredients in hydrogen peroxide can sanitize, “bleach,” deodorize and disinfect areas.

Method:

  • Pour the peroxide in a spray bottle and apply to the shower door.
  • Let it rest on the surface for about half hour.
  • Use a cloth or sponge to work it in.
  • Rinse the residue an wipe away excess water.
 Timely Tips:

As withany product, caution is the buzzword.

Wear your gloves and avoid using full strength hydrogen peroxide. It may irritate the skin or lungs.

  1. White Wine:

Other recommendations include using white wine to clean away gunk from shower doors.

  1. Tea Tree Oil:

Some studies suggest the anti-fungal properties in tea tree oil can help break up soap scum deposits.

Since tea tree oil kills bacteria, it may help dispel bacteria in the soap scum.

  1. Borax:

Borax is another age-old, affordable, multi-purpose product that can help keep shower doors clean.

It helps break down dirt and grime and also deodorizes.

 How to Use:

Studies suggest mixing a solution of two cups warm water with two tablespoons of borax.

  • Apply to the areas as needed.
  • It will work through stubborn water stains and build-up, leaving your doors clean and bright.
  1. Meyer’s Daily Cleaner

  • Mrs. Meyer’s brand of natural alternative household cleaners is another choice to consider.
  • Studies suggest they contain organic compounds used in aromatherapy to help kep the home clean and fresh.
  • The shower cleaner helps break down soap scum and mineral deposit stains on shower doors.

 How to Use:

Do not dilute. Spray onto the shower doors and wipe clean with a clean cloth.

  1. Lemon Oil Furniture Polish:

There’s a suggestion to use little lemon oil furnisher polish to help prevent steady build-up on shower doors.

Numerous studies promote lemons as a natural cleaner.

Some recommend that lemon oil acts as a barrier to minimize build-up.

How to Use:

  • After you clean the shower doors, place a few drops of lemon furniture oil on a cloth.
  • Work the oil around the doors and leave it on for a few minutes.
  • Wipe it clean with a dry cloth.
  • The slight film that remains will help repel soap scup.

Unconventional Options: 

  • Rain-X and Water Armour

They are automotive products used to keep water off windshields. Studies suggest you try it on shower doors to help repel water stains.

  • WD-40:

How did we miss this one? WD-40 is used to remove water stains and is another option for shower doors.

It can help reduce the white soap scum film, clean and polish the glass doors to a new shine. It will also spruce up the metal lining around the doors.

How to Use:

Follow the instructions for safe use.

  • Make sure the room is well ventilated.
  • Open any windows and bathroom door before applying the product.
  • Be careful to avoid inhaling the fumes while you work.
  • Open the shower doors and spray the WD-40 onto each surface.
  • Let it set in to help break down mineral deposits and soap scum.
  • Wipe away residues with a clean cloth.
  • You may apply a second coat as needed for heavy buildup.
  • Let it sit for a more extended period and use a squeegee or magic eraser to work it in.
  • Wipe the doors with a clean rag.
Timely Tips:
  • WD-40 can be oily. Make sure you wash the entire shower floor down to avoid slipping.
  • After you clean the shower doors, spray WD-40 on and wipe clean. It will help minimize streaking and keep the white film at bay.
  • You can apply once a month to make scheduled cleaning less tedious.

If you want to know more about how to clean glass shower doors you can watch below video

Conclusion:

Glass Shower doors lend a sense of style and elegance to any modern bathroom. While many admire the look, it can be discouraging to watch hard water stains,and unsightly soap scum accumulate.

If you’re thinking of remodelling your bathroom, you don’t have to worry about installing shower doors.

Have a plan in place to schedule daily, weekly and monthly cleaning to help keep them clean and fresh-looking.

Regular cleaning will help minimize excess build-up and reduce heavy cleaning which may leave scratching and streaking.

A plan will also help reduce stress and allow you to enjoy your bathtime experience. And of course, you can show off your bathroom at any time!


Filed Under: Blog, How to

Next Page »

Primary Sidebar

16 Boho Farmhouse Living Room for Eclectic Comfort

November 19, 2025

16 Boho Farmhouse Bedroom for Cozy Retreats

November 19, 2025

17 Low Maintenance Bathroom for Functional Style

November 19, 2025

19 Fall Tray Decor Ideas for Stylish Displays

November 19, 2025

18 Organic Modern Bathroom for Natural Comfort

November 19, 2025

Forget flushing the toilet without handle, if you ever consider buying new toilet, please consider buying this amazing toilet

TOTO CST454CEFG#03 Drake II Two-Piece Elongated 1.28 GPF Universal Height Toilet with CEFIONTECT, Bone
Buy on Amazon