• Skip to primary navigation
  • Skip to main content
  • Skip to primary sidebar

Shower Redefined

Redefine your Shower Experience

  • Home
  • Blog
  • Review
    • Cleaner
      • Glass Shower Door Cleaner
      • Shower Cleaner
      • Drain Cleaner
    • Shower Head
    • Toilet
  • Contact Us
  • About Us
  • Show Search
Hide Search

American Standard Cadet 3 Review

October 21, 2018 By Mark Benett

american standard cadet 3 review
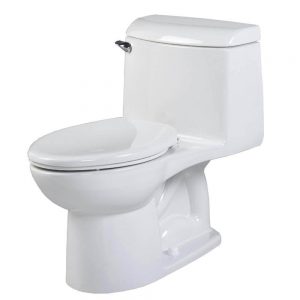
In this American Standard Cadet 3 review, we will focus on a combination tank and bowl toilet system.It features a concealed trap-way, elongated, white toilet set. The product comes with a seat and has a large flush valve.

One significant aspect of the toilet is its use of a top mount, slow-closing seat with a seamless lift-off cover.

The fixture has a clean, shiny, virus-resistant finish and a siphon action jetted bowl. There is also a hidden, smooth-surface trap-way.It weighs over 100 pounds and operates on WaterSense and Comfort Height capabilities.

Design, Materials & Finish

American Standard Cadet 3 is a 2-piece, water-saving system utilizing smart gravity technology.  It handles flushing in one easy go, with fewer clogs.

The Cadet 3 toilet combines high performance with low-water consumption.  It features EverClean surface glazing with a patented silver-ion coating.

The protective barrier withstands fungus, mold, algae, and mildew.  The toilet is available with an elongated or round front design.It has a large siphon trap-way and extra-wide flushing valve. These systems are durable and force significantly more waste than regular toilets.

The water-efficient design flushes quickly while using less water per gallon.

Cleaning (How it works to clean the waste)

When preparing this American Standard Cadet3 toilet review, we also found that it highlights a super- fast, water-saving flushing action. The Cadet 3 flushing component process as much as 1,000 grams of bulk waste in one flush.

The EverClean smooth surface helps make cleaning more comfortable and more hygienic. The massive siphon action and trap-way help minimize clogs for a cleaner, stress-free flush after use.

A pressurized rim allows the bowl to power-wash itself.  The technology uses trapped air inside the tank which forces the water from specific rim holes to clean and sanitize the bowl.

Water Consumption

The Cadet 3 toilet is a high-performing, low-consumption system that uses up to 20 percent less water than regular toilets. It amounts to at least 1.28 gallons of water per flush.

The siphon and trapway capabilities are also larger than standard toilets.  It means there are fewer clogs and flush significantly larger quantities of bulk waste.The systems work quickly and efficiently while utilizing less water to thoroughly flush the toilets.

The flush valve opening is also broader than standard toilet valves.  It lets more water into the bowl over 80 percent quicker than those with 2-inch pipes.

Performance (Flushing Effectiveness)

The Cadet3 toilet ranks in the 50 best commercial 2-piece toilets available.The flushing technology produces faster, stronger action each time you flush.

It’s EPA WaterSense certified for high-efficiency and approved for use by person with disabilities.

The system rates as the highest performing toilet in its range by processing 1,000 grams of bulk waste in a single flush.Smart Gravity technology also helps build its reputation for a consistent, one-flush action with fewer clogs.

The other flushing components also combine to produce a toilet that uses significantly less water, while maintaining a cleaner bowl.

You can watch below video for your reference

Durability

The fast, powerful flushing mechanism of the Cadet 3 toilet does not compromise the superior workings of the unit.

The sturdy flushing valve will not twist or warp under pressure like some valves. The body of the bowl has a Vitreous China coating which produces a non-porous body that withstands leaks, rust, and corrosion.

EverClean is a patented, permanent silver-ion preservative in the bowl surface.  The antimicrobial coating has a long-lasting seen that remains clean for extended periods even after normal wear and tear.

The glazed surface helps protect the bowl surface from staining, fungus, algae, mold, and mildew.

Maintenance

The American Standard Cadet 3 toilet is easy to maintain.

The flushing system takes care of large quantities of bulk waste and helps control the incidence of clogging and blockages. There’s no need to plunge.

There’s also a power-wash, pressurized rim that scrubs the bowl after each flush. It reduces the need for chemical cleaners.Other hygienic features help reduce bacteria and other particles from building up on the surface.

The bowl surface wipes clean with warm, soapy water and a regular shining.  The smooth, glossy surface and color remain in good condition for many years.

Pros

  • The toilet cleans itself
  • The easy-lift seat cover is convenient
  • Its suitable for persons with disabilities
  • It saves water and flushes efficiently
  • The design is trendy and attractive
  • The bowl refills quickly after flushing
  • The toilet is easy to clean and maintain
  • It does not clog
  • Works as advertised
 

Cons

  • The toilet is difficult to install
  • Some parts are flimsy
  • The seat adjustment is faulty
  • Customer service is not the best
  • The toilet bolts are hard to access
  • The rough-in dimensions are unclear
  • Sometimes you may find design defects

Final verdict

So in our final American Standard Cadet 3 review, we found that it’s replete with qualities that set it apart from other toilets. I endorse this toilet for efficiency, comfort, and durability.

It combines water-saving abilities with power-flushing action that is fast and effective. There’s a pressurized rim to power wash the bowl, and EverClean technology to preserve the bowl surface.

It is high-performing and eliminates and minimizes clogs and reduces maintenance costs. ComfortHeight technology makes it suitable for taller users and those with disabilities.

WaterSense capability results in less water use per flush. It helps save water and is kinder to the environment.


Filed Under: Uncategorized

American Standard Champion 4 reviews

October 5, 2018 By Mark Benett

american standard champion 4 reviewsThe American Standard Champion-4 Right Height toilet is an H2Option siphonic dual flush elongated toilet system. It also utilizes less water than regular toilets and is self-closing and flapper-free. It ranks among the top 20 Kitchen & Bath Fixtures, One-Piece Toilets, best-selling products. In this American Standard Champion 4 reviews, we can confidently say that this toilet far exceeds industry standards.

The toilet is entirely factory flush tested, which operates at a very high level of performance. There’s no need to plunge as it helps eliminate clogs.

Design, Materials & Finish

When preparing this American Standard Champion 4 reviews, we found that it highlights a one-piece fixture, fully glazed, white, porcelain, elongated toilet. The fixture weighs about 120 pounds and the seat is approximately 17 inches high.

It comprises a 2-3/8 inch Siphon Trap-way and EverClean, a highly-approved, and internal and external permanent anti-microbial surface.

The surface protects the bowl from scratching, and wards off mildew, mold, and bacteria. It’s available in white, linen, silver, black, and bone.

The seat cover has a flap-free, self-closing valve system for a softer close after use. The seat meets the industry standards for Americans with Disabilities guidelines.

Cleaning

The toilet delivers excellent flushing action after every use. It has a fast-acting valve and siphon trap-way that eliminates waste efficiently.

The piston movement activates the valve to pump water into the bowl more than three times faster than regular flush valves.

The valve also delivers less water at faster speeds than regular toilets. The high—performing flushing action conserves water while providing a cleaner flush after use.

The EverClean shiny surface protects the bowl from mildew, mold and bacteria build-up. You spend less time and effort cleaning the bowl since it repels odors and protects the color.

Water Consumption

The powerful piston accelerator flushing action delivers fast, high-quality, efficient flushing. It promotes a higher flushing action while using less water.

The flush valve propels water faster than most standard toilets and uses less than 2 gallons of water per flush (GPF). The average bowl can utilize as many as 5 gallons per flush.

The extra-wide trap-way assists the valve in pushing more waste faster and more efficiently through the system. It produces a powerful, cleaner flush while saving water.

Performance

If we have to write unbiased findings for the American Standard Champion-4 review then it is not wrong to be said that this toilet is so elongated with a highly effective flushing action that can easily be considered as one of the best flushing toilets.

It boasts a 4-piston flush valve accelerator that delivers strong flushing and stops clogs in their tracks. There’s no need to use the plunger or call the plumber to clear unpleasant backups.

The elongated siphon action jetted bowl forces water into the bowl faster and more powerfully than regular toilets.

Durability

The toilet design comprises vitreous china, an enamel coating that’s added to the porcelain surface. The process helps create a stronger, industrial-strength toilet that can stand up to the rigors of everyday use.

It weighs almost 120 pounds and comes with bolts and caps for a sturdy seal. The permanent EverClean surface technology helps protect the bowl from stains, odors, mildew, bacteria, and mold.

The permanent seal is on the inside as well as the outside, so the surface remains shiny and requires less cleaning time and effort.

Maintenance

Although the toilet is sturdy and durable, there are a few ways to help keep it performing at maximum capacity. Normal wear and tear can cause leaks, slow flushing or other related issues. For proper maintenance you can check below guidelines

  • Always observe the rules for setting up the toilet as explained in the users’ manual.
  • Use the right accessories and fittings for the toilet to ensure safety and stability.
  • Clean in and around the bowl with mild, soapy water and dry the surface thoroughly with a cloth to avoid spots and stains. In-tank cleaners can cause irreparable damage to your bowl or may spring a leak.

You can watch below video to learn more

Pros

  • The toilet performs efficiently.
  • It saves water and maintenance costs.
  • The design is attractive and trendy.
  • It’s highly durable.
  • User-friendly and easy to clean.
  • Comfortable for persons with disabilities.
  • The seat action is quiet.
  • Space-saving

Cons

  • Flappers tend to wear down quickly.
  • This toilet is heavy and more expensive.
  • The chain on the handle of the flushing valve can be faulty.
  • Toilet base, seat, and the tank may not be level.
  • The valve closes too quickly to facilitate a proper flush.
  • Seat and lid material are flimsy.

Final verdict

The American Standard Champion-4 toilet is a one-piece, high-performing, thoroughly tested toilet.

It surpasses many standardized tests for quality, design, efficiency, and compatibility. Also, it flushes faster, removes more waste, with more efficiency than many regular toilets, while conserving water.

This toilet is a sturdy, attractive, economical choice that delivers consistent performance. The siphon trap-way has a broad opening that collects more waste than other toilets, depending on the brad you use.

Independent tests show the toilet tops the list for high-performing flushing action among similar brands. I recommend this toilet for its high-quality design, strong flushing action and overall durability.

Filed Under: Uncategorized

How to Make a Toilet Flush Better

August 25, 2018 By Mark Benett

How to Make a Toilet Flush BetterMany people wonder how to make a toilet flush better. But how do you actually do it if you have no previous experience?

Slow flushing toilet can be a nightmare for someone, especially if you have a big family. During the morning rush hours, slow flushing toilet can make you waste time.

You will be wasting your time and time of every family member in your household.

Every toilet differs in things. However, the principle is the same.

You don’t need to be a plumber to be able to understand how your toilet works. Neither to learn how to make your toilet flush better.

In this post, you will find everything necessary that will help you fix your slow flushing toilet.

Why Would You Need to Get Your Toilet Flush Better?

There are many reasons to getting your toilet flush better. Being annoyed by waiting is just one of them.

It’s true that slow flushing toilet can waste your time and waste time of everyone in your family. It can even make you be late for work.

Regardless, slow flushing toilet can cause some other problems as well. If your toilet isn’t flushing properly, it might not get enough of water in the toilet bowl in needed time.

If the toilet isn’t flushing quickly enough, it might not be able to completely dispose of human waste. You would need to flush your toilet twice or maybe even three times then. Flushing toilet more times won’t only make you wait for the water tank to refill. You will also waste more water which results in higher water bill at the end of the month.

There is absolutely no reason to waste neither your money nor your time. It’s time to come to an end with slow flushing toilets.

What Are the Reasons for Slow Flushing Toilet?

It’s most likely that you’re having a slow flushing toilet problem. Slow flushing toilet can’t efficiently dispose of human waste as it should.

Since toilet is made from three most important parts, the problem can be in either one of them. If you aren’t familiar with toilet parts, there’s no reason to worry. We will keep it simple so everyone can understand.

The three main parts of every toilet are the toilet bowl, the water tank, and the mechanism.

Water Tank Problem

The most common reason why your toilet isn’t performing at the wanted flushing speed is simple. It is the water tank. The mechanism inside the toilet water tank is constantly in water. Therefore, it has its limited lifespan. If something from the mechanism isn’t doing its job properly, it’s a problem. Slow flushing toilet problem might occur.

Release Valve Clogging

Another reason might be the release valve where the water flushes to your toilet bowl. Whenever you press the flush button on your water tank, the valve releases the water that is inside the water tank. If it’s blocked, or not opening properly, the water might be going out slower than it should.

How to Make a Toilet Flush Better

There is no one way to make your toilet flush better. As mentioned before, it’s most likely that toilets differ from model to model. But also, not everyone might have the same problem.

1st Step: Locate the Problem

Before you even make your toilet flush better, it’s important to find the cause of the problem. Most likely that it’s going to be inside the water tank. Although it is a problem, it’s still easily solvable.

2nd Step: Clean Your Toilet Regularly

In my opinion, the best way to find the cause of the problem would be by cleaning your toilet. As you are cleaning your toilet, you will most likely come across the problem. You might even eliminate the problem as you clean your toilet without even knowing.

The toilet should get cleaned at least once a week. If it’s not done at least once a week, the water inside the water tank might leave calcium. Also mineral build up that comes from the tap water. Such buildups can slow the flushing speed, but also create a number of other problems.

3rd Step: Improving the Water Capacity

However, sometimes, only some improvements are necessary.

Inside the water tank, you have the ability to change the capacity of water inside it. It can simply be done by lifting up the water level bar inside the water tank to another level. Most of the new water tanks have the ability to raise the water capacity.

Raising your water capacity inside the water tank is a great solution. You will be flushing more water into your toilet bowl. The more water there is, the heavier impact will be. Therefore, your toilet flushing speed will improve.

If you are unsure how to change the capacity of water in your water tank, take it slow. It’s the best to find the manual or look up online your water tank model.

You can also watch below video for better understanding

Things to Avoid When Improving the Flushing Time of Your Toilet

The thing you should definitely avoid is to mess with other components inside your water tank.

I don’t recommend you take the mechanism of your water tank apart, for example. But you can look around and see if there’s anything causing the problem.

Also feel free to change the water tank volume. That’s something manufacturers have made available for all users to do themselves.

Never leave toilet cleaning products for too long inside the water tank. Otherwise, it might weaken the material of your water tank and its mechanical parts.

Conclusion

If you come to the point where you need to look for solutions, stay calm. Look for various solutions and you will make it work.

You don’t need to replace your toilet whenever you experience a problem. However, we agree that it can be really frustrating, time-wasting, and annoying.

There are many reasons why your toilet flushing speed is not the best. There are also many different ways to fix it. If you follow the post, you will be able to understand what to look for, and how to actually fix it.

How slow is your toilet flushing? Did you do something about it already?

Filed Under: Blog, How to

Liquid Plumr vs Drano! Which one is Perfect For you?

July 27, 2018 By Mark Benett

Liquid Plumr vs Drano

If you are familiar with Drano and Liquid Plumr and are not quite sure which one will work for your plumbing needs, you are in the right place.

Liquid Plumr and Drano are powerful, quick acting drain cleaners that will help you clear your drains of gunk, soap scum, hair and other organic matter.

They work to dissolve tough clogs and increase the water flow in your drains. Both of them are safe to use with most types of plumbing material like PVC, plastic, and copper.

They are user-friendly, versatile and affordable and can also work to clear septic tanks and garbage disposals.

Other products in both ranges include Drano granules for kitchen clogs and a foaming gel. Liquid Plumr comes in both slow flow and heavy-duty gel formulas.

To help clear slow-moving or tough clogs, improve water flow and protect your plumbing at the same time, Drano and Liquid Plumr are two great options to consider.

Liquid Plumr Pro-Strength Full Clog Destroyer Plus Pipe Guard


Liquid Plumr uses powerful triple action strength to clear fully blocked drains quickly. Pipe Guard capability protects your pipes with a coating while clearing the drains.

Features:

Liquid Plumr ranks among the ten best-selling Health and Household products. It also rates in the top 100 products in the Household Cleaning Drain Openers list.

  • The full-strength clog cleaner powers through fully blocked drains.
  • It’s good for slow-moving drains, septic tanks, and garbage disposals.
  • Liquid Plumr employs triple action formula that moves through the stagnant water to unclog tough drains.
  • It protects pipe materials with Pipe Guard

Benefits of Liquid Plumr

  1. Fights drain odors and help to improve water flow. The gel leaves a repellent shield which reduces grime build-up.
  2. It works swiftly and effectively to clear clogs.
  3. Using the gel with garbage disposals and septic tanks is safe.
  4. Liquid Plumr can work with plumbing materials including copper, old pipes, plastic, metal

How to use Liquid Plumr

Pour about 16 ounces into the drain. Let it sit about fifteen minutes or longer if needed.

Flush down with hot water.

For best results, use Liquid Plumr regularly as part of your monthly plumbing schedule.

PROS

  • Saves on plumbing expenses
  • Works fast and efficiently
  • Affordable
  • Works as advertised

CONS

  • May cause burns if you use it without gloves
  • Cap may be difficult to open and close
  • The gel may clump or separate

Check Latest Price!

Drano Max Clog Remover


Drano is a gel-based drain formula that works quickly to clear blocked drains and increase water flow. Using Drano with most types pipe materials and septic tanks is safe.

Features of Drano

Drano cleaner ranks #1 in the Health and Household drain openers and in the top 100 best-selling drain cleaning products. Drano’s powerful action works fast to rid your drains of soap scum, hair and other gunk in your plumbing systems.

It’s a thick,fast-dissolving formula that cuts through tough blockages.

Added substances protect your plumbing from corrosion.

It’s safe to use in garbage disposals, septic tanks, and other plumbing materials including plastic, PVC, or metal.

Drano has no phosphorous and will give off no toxic fumes if left in the drain overnight.

Benefits of Drano

  • It works through standing water to clear clogged drains.
  • It improves water flow in sinks, showers and other drains.
  • Using Drano with most types of plumbing materials is safe.
  • Drano gel can also work to unclog garbage disposals and septic tanks.
  • It dissolves tough clogs including hair, soap scum build-up, grease, and oil.

User Tips and Safety Guides

  1. Use the product only as directed.
  2. Do not use Drano in your toilet bowls or expose children to drains that contain Drano
  3. Never plunge after or while Drano is inside the drain.
  4. Protect your hands and be careful not to splash.
  5. Open the bottle carefully and avoid applying too much pressure.

Open with care

Press down carefully on the lid with the palm of your hand. Turn the cap to the right to unscrew.

Don’t squeeze the container or splash the liquid. Clean up any spills promptly.

To avoid toxic fumes the cap by pressing on the cap to screw it on securely after use.

Clearing slow-running or fully clogged drains

  • Pour about ½ the bottle or at least 32 ounces slowing into the drain.
  • For fully clogged drains, pour the full contents of Drano into the drain.
  • Let the cleaner work through the drain for at least 15 minutes to half an hour.
  • Flush the drain with hot water.
  • If the first application does not work, insert another portion to the drain as needed.
  • Let it work through and flush with hot water.

Clearing Garbage Disposals

  1. To clear garbage disposal clogs, pour at least ½ bottle into the drain.
  2. Let the formula sit for 15 to 30 minutes to work through the clogs.
  3. Flush the drain with hot water.
  4. If clog remains, do not switch on the disposal; the remaining Drano may splash up. It may be better to call a plumber.
  5. When the drain clears, follow up by applying Drano every month to help keep the drains clean.

Pros

  • Clears clogs as advertised
  • Affordable
  • Works quickly and efficiently
  • Great for removing hair and tough clogs

Cons

  • The bleach in Drano did not work well with septic tanks
  • Had to repeat the application often to get results

Check Latest Price!

Liquid Plumr vs Drano

Similarities

  • Both products are safe for all pipes, garbage disposal, and septic tanks
  • They are not suitable to use in toilet bowls,
  • Can Pour through standing water,
  • Both Form coating gel in pipes,
  • Same basic chemical formula – sodium hydroxide and sodium hypo chloride
  • Help improve water flow
  • Both contain Thick gel formula,

Differences

Particluar Liquid Plumr Drano
Chemical Composition Contains phosphorus instead of chemical sodium silicate. Slightly higher foaming action Drano contains chemical sodium silicate instead of phosphorus. Produces less foaming action.
Liquid Thickness Appears less thick Appears at least 50% thicker
Toxicity Claims to be highly toxic Claims to be less toxic
User Guide Not indicated to leave overnight Safe to leave overnight
Use as Second Treatment Can use as a second treatment if the first application does not work Not recommended to use as a second treatment
Better Works on Fully blocked as well as slow-moving drains. Studies show it works faster at dissolving gunk, oil, hair,and grease and in less time than Drano Slow-moving clogs, Seems to work slower at removing clogs
Special Features Triple Action formula works to Unclog drains, protect pipes, deodorize, reduce and prevent drain odors. Pipe Guard Technology protects pipes with a repellent barrier while unclogging drains Drano does not contain triple action formula and Pipe Guard Technology
Product Range Product range is not very wide Wider Product range
Price More expensive per ounce Check Price Less expensive Check Price

You can also watch below video for the better understanding

Conclusion

Both Liquid Plumr and Drano are good options to help clear clogged drains. They work fast and powerfully to dissolve gunk, grease, soap scum, hair, and other organic matter.

Both products contain similar chemical ingredients, except for one addition in Drano While Liquid Plumr seems to work faster, Drano appears thicker and has fewer chemicals.

Filed Under: Review, Drain Cleaner

How to Remove a Flow Restrictor from a Shower Head

July 21, 2018 By Mark Benett

How to Remove a Flow Restrictor from a Shower HeadInstalling a flow or water restrictor is intended to control the water flow in your shower head to less than 3 gallons per minute.Some regulators stipulate their use to help reduce water wastage in the shower.While the flow restrictor helps reduce flow to save energy and water, there may be challenges.

If the water pressure in your area is generally slow, a flow restrictor will slow down your flow even greater. Hence, you may need to take it out.Bear in mind that when you remove the flow restrictor, your water use may increase and escalate your monthly bill.

How do I locate the restrictor?

Check behind the metal piece in the shower head. It has a circular, flat, star-shaped design. The restrictor is the plastic part that covers the shower head inlet.They may come in colors and have slim, open inserts close to the edges.

Here are your tools:

Adjustable wrenches ,Paper clip,Towel or cloth,Plumber’s tape,Needle-nose pliers and Screwdrivers

Disconnect the shower arm from the tap

  • Use a wrench and detach the shower head from the arm.
  • Protect the parts from scratches or damage with a cloth, towel or masking tape.
  • Wrap the cloth around the parts and turn until it comes loose.
  • Look for the connection from the arm that’s attached to the wall.
  • Unfasten the ball joint inside the shower head with a wrench.
  • Remove the shower head from the arm.

Troubleshoot:

Apart from the flow restrictor, there are other areas than you need to check.If hot water runs through your shower head, examine the water heater for any issues that may also restrict water flow.

Sediment can build up in the water heating.

Make a full flush of the hot water system to remove any buildup.

Studies suggest you may install a water softener to help reduce sediment or replace the anode rod regularly.

Remove the gasket and screen:

Turn the shower head over and take out the gasket. The screen is attached to the inlet of the handle or shower head.

  1. Straighten the end of a paper clip and poke it around the gasket or O-ring inside the shower head.
  2. If it doesn’t come loose, try to pry it out with a screwdriver.
  3. Remove the gasket and protect it from any damage.If it is damaged, replace it with a new one.
  4. Examine the shower head and take out the screen if there’s one.
  5. Give the shower head a few knocks to dislodge the screen. If it stays in place, take it out with pliers.

How to clean the screen:

Take the screen; place it under the tap and let the water run on it. The water will help clear away any dust or sediment.

  • Position the paper clip under a part of the restrictor.
  • Twirl it and lift it up to take out the flow restrictor.
  • You can also use a screwdriver or pliers to help pry it out.

Put the shower head back together:

  • Put the gasket inside the shower head and slip it back into position.
  • Re-install the shower screen inside the shower head.
  • Unwind the plumber’s tape from the threads around the shower arm.
  • Apply some fresh tape around the shower arm threads.
  • Use a wrench to fasten the head connector onto the shower arm.

What if my restrictor is in the handheld shower?

To remove the restrictor from the handheld fixture:

  • Check the instructor’s manual to help locate the restrictor.
  • Look inside the part that connects shower arm or at the edge of the handle which attaches the flexible tubing.

How to remove the restrictor

First, unfasten the restrictor.

If the restrictor is at the edge of the handle:Wrap the connections with a cloth. Take hold of the nut with pliers. Turn it to the left to unfasten and take out the handle form the tubing.

Take out the washer

  • Uncover the restrictor.
  • Next, use the pliers and take out the washer within the handle and the filter screen.
  • Remove the restrictor with a screwdriver.
  • Now that the restrictor removed from the handheld shower, it’s a good idea to keep it working well.

How to help improve water flow in the handheld shower

Apart from replacing the water restrictor, you can help maintain the water flow in your shower head.It’s a good idea to make regular maintenance checks on our handheld shower.A regular maintenance schedule will lend support to the restrictor.

The process:

  • Reduce buildup in the handheld shower.
  • Keep the rubber tips on the shower head clean.
  • Minimize water spots around the handheld shower.

1.Treating buildup in the handheld shower

  • Detach handheld shower head from the connecting hose.
  • Let the fixture rest in a vinegar and water solution for a few hours or overnight.
  • Rinse away any sediment and dry it with a cloth or towel.

2. Treating the rubber sprays

Brush away any sediments around the hand held shower with a soft cloth or by hand.

3. Treating water spots

Rinse the handheld shower head with warm water.Dry it and reinstall it.

What if my restrictor is inside the holder?

Tools:
  • Pliers
  • Pipe wrench
Process
  • Wrap a towel or rag around the connections and the shower arm.
  • Use a pipe wrench to grip the shower arm and the pliers on the nut.
  • Turn the nut to the left until the holder comes loose from the arm.
  • Use the pliers to take out the washer and filter screen from the end of the holder.
  • Detach the restrictor with a screwdriver.

Re-connect the parts:

  • Put the filter screen back into the washer.
  • Secure it in place with a twirl of the finger.
  • Peel away any worn plumber’s tape from around the threads.
  • Apply some fresh tape to the shower arm, twisting it to the right.
  • Fasten the connector to the threads by hand.
  • Place a cloth over the nut and tighten it with a wrench.

You can also watch the below video for more information

Conclusion:

A water flow restrictor is used to help reduce water wastage by controlling the amount of water in the tap.Removing the restrictor may increase water flow, as well as energy usage and costs.Follow all instructions. Locate the restrictor and check other areas that might affect water flow. Remove it, reassemble all parts and allow your flow to increase.

Filed Under: Blog, How to

« Previous Page
Next Page »

Primary Sidebar

16 Boho Farmhouse Living Room for Eclectic Comfort

November 19, 2025

16 Boho Farmhouse Bedroom for Cozy Retreats

November 19, 2025

17 Low Maintenance Bathroom for Functional Style

November 19, 2025

19 Fall Tray Decor Ideas for Stylish Displays

November 19, 2025

18 Organic Modern Bathroom for Natural Comfort

November 19, 2025

Forget flushing the toilet without handle, if you ever consider buying new toilet, please consider buying this amazing toilet

TOTO CST454CEFG#03 Drake II Two-Piece Elongated 1.28 GPF Universal Height Toilet with CEFIONTECT, Bone
Buy on Amazon