• Skip to primary navigation
  • Skip to main content
  • Skip to primary sidebar

Shower Redefined

Redefine your Shower Experience

  • Home
  • Blog
  • Review
    • Cleaner
      • Glass Shower Door Cleaner
      • Shower Cleaner
      • Drain Cleaner
    • Shower Head
    • Toilet
  • Contact Us
  • About Us
  • Show Search
Hide Search

How to Clean Glass Shower Doors

June 6, 2018 By Mark Benett

how to clean glass shower doors
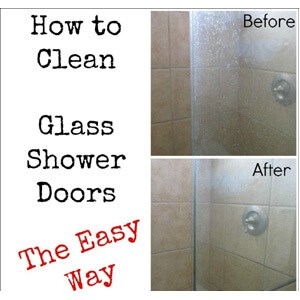
Let’s face it! Glass doors in your shower can give your bathroom a sleek, modern look, but may be hard to keep clean.

Constant showering will cause soap scum build-up. Hard water stains, mildew, mineral deposits and dead skin cells will cause your doors to appear cloudy.

With a tight schedule, keeping shower doors clean can be a chore. In a few easy steps, we can show you how to cope.

So how to clean glass shower doors and keep it like new

Set up a Cleaning Regimen

  • To help minimize build-up on your shower doors. Schedule a cleaning program that can keep them looking great every time you step into the bathroom.

There’s an array of cleaning products available to help keep your shower doors clean.

Points to Consider:

  • Your choice will depend on your preferences.Exposure to some chemicals may cause allergic reactions to yourself our others.
  • You may opt for other natural methods which we will explore as we go along.
  1. Practice Daily Cleaning

Make it a habit of giving the doors a once-over after you shower.

While it may seem unrealistic for some, it only takes a few extra minutes.

Timely Tips:

  • Daily wipe downs will help lessen build-ups and reduce harsh, weekly or monthly cleaning.
  • After you shower, take a cloth or towel and wipe the doors dry. It will reduce water stains on shower doors.
  • Use the heat and steam immediately after showering to help break down soap scum as you scour the surface.
  • Leave the shower doors open to allow the water and mist to evaporate.
  1. Reduce the use of Solid Soap

Soap scum build-up is one of the significant causes of cloudy shower doors. If left unchecked, it can be hard to remove.

Some natural soaps may contain ingredients like paraffin and talc. They can contribute to the problem.

 You can opt for:
  • Natural soaps with fewer inorganic ingredients
  • Liquid s
  • oap that may be more compatible with hard water

Some shampoos and body washes may contain oils that can cloud up shower doors. Opt for more natural products, which work better with hard water.

  1. Minimize Streaks and Scratches

  • Use soft materials like microfiber cloths or sponges to minimize scratching between cleaning.
  • After you wipe the doors down, finish it with a splash of spray cleaner of your choice.
  • Clean your rags after each use to avoid dirt and mold build-up. You can launder them in the washing machine as well.
  1. Take care of Cracks and crevices

One of the areas of concern in the shower is the unsightly trail of soap and mildew stains around the door tracks.

Some studies suggest filling in any spaces in the door track. One study recommends using vinegar.

Apply the vinegar for as long as possible, even overnight if necessary. Wipe it clean, and watch it sparkle.

  1. Monthly Deep Cleaning

In spite of good intentions, we may miss the daily routine because of other priorities. Don’t despair; you can still make up for lost time.

Your monthly clean may be a bit more intensive, mainly if the daily regimen falls by the wayside. It means you may have more grime and soap scum to clean up.

 Do-it-Yourself Tips:

You can do the job yourself if you have the time. Schedule a professional cleaner for excess build-up.

For your safety: 

  • Gloves will keep your hands and skin away from chemical spills.
  • Choose the best materials and products to help remove harsh stains and soap scum. 

Here are some choices:

 Chemical Solutions and Materials:

While most chemicals will help remove the gunk from your shower door, some toxic substances may affect your lungs or cause allergic sensitvity.

 Squeegees:

Squeegees work similar to the windshield wipers on your vehicle. The rubber blade helps erase water stains from glass surfaces.

They may be available in stainless steel and can store easily by attaching the suction cup to the bathroom wall.

Microfiber Cloths

Some studies recommend the micro-fiber cloths to get at tight areas like around edges and under the door handles.

They are super absorbent and non-scratching.The fibers reduce build-up and streaking and are ideal for drying and polishing.

Magic Erasers

Magic eraser sponges are affordable, lightweight and non-abrasive.

  • They get between hard-to-reach areas and grooves, to remove dirt and grime between crevices and cracks.
  • The scouring action helps remove mold, soap scum, stains, and mildew.
  • They also reduce fogging on shower doors.

How to Use:

Dampen the sponge lightly with water.

Use gentle strokes and work the area until it is clean.

Wipe the surface with a wet cloth to remove any remaining residue.

Dryer Sheets

Oh yes! Believe it or not, dryer sheets can help remove stubborn soap scum build up on your shower doors.

Hard water stains and calcium deposits make the glass cloudy and dingy. They will clean, minimize streaks and help restore shine.

How to Use:

Slightly dampen the dryer sheets and watch your shower doors come alive with sheen and fewer streaks. They will have your shower smelling fresh as well.

 Barkeepers Friend

While Barkeepers Friend is a multi-purse kitchen cleaner, it can be used in the shower as well.

It’s a gentle cleaning powder that can make quick work in reducing soap scum build-up and promoting shine.

 How to Use:

Put the powder directly onto the glass or add it to a damp sponge or cloth and scrub the doors.

Wear your gloves toprotect your skin.

Krud Kutter

Get rid of soap scum, mold, stains, and mildew from shower doors with Krud Kutter.

  • KrudKutter is a concentrated cleaner.
  • It’s a streak-free option to keep your shower doors looking like new.
  • It’s also ammonia-free and will not damage the glass doors.

How to Use:

Spray it on or use it with a damp cloth.

Wipe the doors until the build-up dissolves.

Shine with a clean cloth.

Tilex:

Tilex is a householdname in cleaning products.

  • The shower cleaner is said to be mild and will help lift soap scum, mildew, and stains from shower doors.
  • The ingredients in Tilex act as a solvent to loosen stins and mineral deposits.

How to Use:

According to instructions, spray on Tilex to shower doors and leave it to do its work.

You can leave it on, no need to wipe away. It’s ideal for daily use to help reduce build-up.

 Natural, Biodegradable, or Non-toxic Options:

Non-toxic, biodegradable products help clean without the risks of exposure to harsh chemicals.

Here are some of the benefits:

  • Save money
  • Protect the environment
  • Reduce allergic sensitivity

Vinegar

  • It is long used as a household cleaner. The acetic acid acts as a solvent and helps break up mineral deposits.
  • It’s a good product for cleaning glass and unclogging drains. Vinegar is relatively cheap when compared to commercial products.
  • Vinegar works well on the glassbecause it does not streak, so yourdoors stay bright and clean.
  • Studies recommend you dilute the vinegar with water to minimize damage from the acid.

Method:

  • Mix equal parts vinegar and water. You can use the spray-on method from a bottle or wipe with a cloth.
  • Dampen a clean cloth and wipe the surfaces.
  • Rinse with warm water.
  • Repeat the process if necessary.
  • For hard to move build-up, use the undiluted vinegar.
  1. Baking Soda

Baking Soda is another cheap but non-toxic option to clean shower doors.

It is non-abrasive and gentle on surfaces.

It neutralizes stains and odors and freshens surfaces. 

Method:

Sprinkle baking soda on the surface, onto a damp cloth or make a paste with water.

Work the area until stains are gone.

Wipe clean with a fresh towel or sponge.

  1. Hydrogen Peroxide

Peroxide is another alternative to commercial cleaners.

  • It’s proven to be less harsh than bleach,and it’s a good option for cleaning shower doors.
  • Peroxide is a natural antiseptic and stain remover.
  • It will help dissolve mildew, dirt, and mold that may accumulate around the shower door frame.
  • The ingredients in hydrogen peroxide can sanitize, “bleach,” deodorize and disinfect areas.

Method:

  • Pour the peroxide in a spray bottle and apply to the shower door.
  • Let it rest on the surface for about half hour.
  • Use a cloth or sponge to work it in.
  • Rinse the residue an wipe away excess water.
 Timely Tips:

As withany product, caution is the buzzword.

Wear your gloves and avoid using full strength hydrogen peroxide. It may irritate the skin or lungs.

  1. White Wine:

Other recommendations include using white wine to clean away gunk from shower doors.

  1. Tea Tree Oil:

Some studies suggest the anti-fungal properties in tea tree oil can help break up soap scum deposits.

Since tea tree oil kills bacteria, it may help dispel bacteria in the soap scum.

  1. Borax:

Borax is another age-old, affordable, multi-purpose product that can help keep shower doors clean.

It helps break down dirt and grime and also deodorizes.

 How to Use:

Studies suggest mixing a solution of two cups warm water with two tablespoons of borax.

  • Apply to the areas as needed.
  • It will work through stubborn water stains and build-up, leaving your doors clean and bright.
  1. Meyer’s Daily Cleaner

  • Mrs. Meyer’s brand of natural alternative household cleaners is another choice to consider.
  • Studies suggest they contain organic compounds used in aromatherapy to help kep the home clean and fresh.
  • The shower cleaner helps break down soap scum and mineral deposit stains on shower doors.

 How to Use:

Do not dilute. Spray onto the shower doors and wipe clean with a clean cloth.

  1. Lemon Oil Furniture Polish:

There’s a suggestion to use little lemon oil furnisher polish to help prevent steady build-up on shower doors.

Numerous studies promote lemons as a natural cleaner.

Some recommend that lemon oil acts as a barrier to minimize build-up.

How to Use:

  • After you clean the shower doors, place a few drops of lemon furniture oil on a cloth.
  • Work the oil around the doors and leave it on for a few minutes.
  • Wipe it clean with a dry cloth.
  • The slight film that remains will help repel soap scup.

Unconventional Options: 

  • Rain-X and Water Armour

They are automotive products used to keep water off windshields. Studies suggest you try it on shower doors to help repel water stains.

  • WD-40:

How did we miss this one? WD-40 is used to remove water stains and is another option for shower doors.

It can help reduce the white soap scum film, clean and polish the glass doors to a new shine. It will also spruce up the metal lining around the doors.

How to Use:

Follow the instructions for safe use.

  • Make sure the room is well ventilated.
  • Open any windows and bathroom door before applying the product.
  • Be careful to avoid inhaling the fumes while you work.
  • Open the shower doors and spray the WD-40 onto each surface.
  • Let it set in to help break down mineral deposits and soap scum.
  • Wipe away residues with a clean cloth.
  • You may apply a second coat as needed for heavy buildup.
  • Let it sit for a more extended period and use a squeegee or magic eraser to work it in.
  • Wipe the doors with a clean rag.
Timely Tips:
  • WD-40 can be oily. Make sure you wash the entire shower floor down to avoid slipping.
  • After you clean the shower doors, spray WD-40 on and wipe clean. It will help minimize streaking and keep the white film at bay.
  • You can apply once a month to make scheduled cleaning less tedious.

If you want to know more about how to clean glass shower doors you can watch below video

Conclusion:

Glass Shower doors lend a sense of style and elegance to any modern bathroom. While many admire the look, it can be discouraging to watch hard water stains,and unsightly soap scum accumulate.

If you’re thinking of remodelling your bathroom, you don’t have to worry about installing shower doors.

Have a plan in place to schedule daily, weekly and monthly cleaning to help keep them clean and fresh-looking.

Regular cleaning will help minimize excess build-up and reduce heavy cleaning which may leave scratching and streaking.

A plan will also help reduce stress and allow you to enjoy your bathtime experience. And of course, you can show off your bathroom at any time!


Filed Under: Blog, How to

How to Make Toilet Flush Stronger

June 1, 2018 By Mark Benett

how to make toilet flush strongerThe best thing about toilet is that everything is automated. However, even if a single thing gets messed up in the toilet system, something can go wrong. How to make toilet flush stronger is something everyone should know. It will become useful at least once in your life.

Toilet doesn’t need to break to present a problem. But even the smallest thing can annoy us or prevent us from using our toilet the way we used to.

If you aren’t maintaining your toilet properly on a regular basis, many different problems can occur. Slow flushing toilet is never been fun. Although, it’s one of the most common problems that can occur for anyone.

By improving your toilet flush strength, you will be able to dispose of the waste more efficiently. But what does it take to actually improve your toilet? You will learn everything necessary in this post right here.

Why Would You Need a Stronger Toilet Flush?

The answer to this question is pretty simple. However, there is a number of reasons why would someone need a stronger toilet flush.

Stronger toilet flush means that you will have better dispose of human waste. Such option is always useful for everyone who has larger toilet bowls.

Nothing happens if you pour a small amount of water down the toilet bowl.

However, a larger amount of water will definitely flush your toilet. Toilet bowl has disposal system. It won’t activate and dispose of human waste if a large amount of water isn’t flushed.

A larger amount of water also means that there is going to be much better pressure on the toilet bowl. A larger amount of water and higher pressure will make your toilet have a stronger flush.

If your toilet isn’t disposing human waste efficiently, you should be worried. It’s most likely that you will need a stronger toilet flush in order to fix that problem.

Benefits of Having Toilet Flush Stronger

There are definitely benefits to having a stronger toilet flush. But it’s also important to understand that there are also cons of a stronger toilet flush as well.

Improving the strength of your toilet flush will definitely benefit you. It will dispose of your human waste in a more efficient and faster period of time.

With stronger toilet flush, you will also get a better pressure in the toilet bowl. Higher pressure is a good thing. If your toilet bowl gets clogged lightly, high pressure will unclog it itself.

Almost everyone can achieve a better and stronger toilet flush. However, that’s not necessary for most people. It’s important to understand the reasons why would you need a stronger toilet flush.

While stronger toilet flush comes with benefits, there are also some downsides as well. More water can clog your toilet even more.

Also, stronger toilet flush depends on more water. That means that you will be spending more water to achieve the stronger toilet flush.

However, that’s not the case most times. Sometimes, a regular toilet cleaning can improve the flushing results.

How to Make Flush Toilet Stronger?

Improving your toilet flush is fairly an easy task. However, it’s important to know exactly what to do.

If you don’t know much about toilets, parts, and how it works – you shouldn’t worry. Everyone can improve their toilet flush strength. You don’t need to be an expert nor call your local plumber every time.

Step One

The first thing I would recommend is to clean your toilet. Sometimes cleaning your toilet properly can unclog valves from water tank to the toilet bowl. Especially if you didn’t spend a lot of time cleaning and maintaining your toilet.

Toilets should be cleaned at least once a week. However, I would recommend you to do it at least twice a week.

Step Two

The next step which will most likely improve your toilet flush strength. It would be changing the water capacity. Every modern toilet water tank nowadays has the ability to have capacity changed by its user.

To do so, you would have to lift the cover-up from the water tank and have a look inside. You will see two main parts and one level rod which connects them. Have a better look and you should notice that the rod at the end has different places where it’s attached.

By attaching the level rod higher, you will allow more water in your water tank. By attaching it lower, you will have less water in your water tank than before.

Please check below video if you want to know how to adjust toilet for stronger flush

Step Three

You will have to do some testing and come up with the best water level for your toilet bowl. More water you put in your water tank and through your toilet bowl – the stronger flush will be.

However, stronger flush will increase your water bill. You will be using more water than before to achieve wanted effect.

If you have struggled with your toilet disposing of your waste slowly, this will be very useful for you.

There is absolutely no experience necessary. Fixing and changing a few things isn’t that hard, right? But, keep in mind that you should maintain your toilet regularly.

Things to Avoid When Improving Strength of Your Toilet

If you don’t want to mess up your toilet, you should be careful when you do things inside the water tank.

Switching the water level capacity by lifting or lowering the level rod is fine. But you shouldn’t change anything else.

Custom changes inside water tank could make your toilet work incorrectly. There isn’t much to mess up, but it’s always better to be careful. Because changing any other setting inside the water tank can do more damage than good.

Conclusion

How to make toilet flush stronger isn’t a secret, and it’s something that everyone can do. All it takes is to believe in yourself. No matter if you don’t have any experience with DIY. It takes a good guidance to make it possible.

Benefits are definitely useful.  Especially if you have been struggling with your toilet flushing speed lately. Also, make sure to check whether your toilet is maybe clogged. Maintain your toilet properly!

How often do you maintain your toilet?

Filed Under: Blog, How to, Toilet

How to Increase Toilet Flushing Power

May 27, 2018 By Mark Benett

How to Increase Toilet Flushing Power
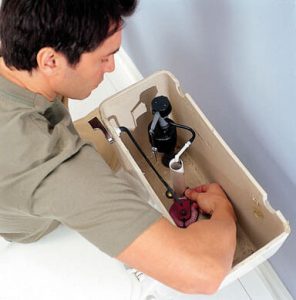
From all of us, everyone has a different, yet very similar toilet setup. How to increase toilet flushing power is a common question.

The location, way of installation, and even toilet models differ. However, we all have something in common. The thing we have in common is the toilet flushing power. When there’s lack of toilet flushing power – all kind of problems can appear.

Flushing power can help you with a few problems. It can help toilets that get clogged often or toilets that are experiencing slow flushing.

Whether you have a large or small toilet, your toilet flushing power should be on point. That way, you will save your time, money, and have your toilet work most efficiently it can.

Why is it Necessary to Have a Powerful Toilet Flush

The toilet which doesn’t have a powerful toilet flush is wasting water, time, and money.

Also, such toilet can cause more problems than toilet which has a powerful toilet flush could. The main reason why it is necessary to have a powerful toilet flush would be to dispose of waste.

If your toilet doesn’t have a powerful toilet flush, that’s not good. You might find yourself having to flush your toilet twice in order to get rid of the waste completely.

If you are experiencing light toilet clogging, there’s solution. Powerful toilet flush could help you resolve your problems.

Powerful toilet flush is the best-optimized way to get the most out of your toilet, with the best efficiency, of course.

Most people believe that the powerful toilet flush uses more water. Therefore, it costs more money, but that’s not always true. If you use more water than necessary to flush your toilet, you will spend some excess water. Thinking you have the best-optimized flush toilet power, you’ll be losing money.

Everyone would want to have the best in their life, right? That should also include things we use on daily basis and things we as humans depend on as well.

Reasons for Slow Toilet Flushing Power

People who want to increase their toilet flushing power are not crazy. They are people who most likely have slow toilet flushing power problems with their toilet.

Slow flushing power can happen because of many different reasons. It also depends on where is the problem located.

Most of the time, slow flushing power is related to clogging. Clogging can happen in the water tank, but also in the valves, and toilet bowl as well.

If you didn’t clean your toilet in a long time, that should be the obvious reason for slow flushing power. Cleaning your toilet is necessary and should be done at least once a week. I would highly recommend you to do it at least twice a week. Not only to save yourself from various bacteria that is in the toilet area. But also to increase your toilet’s chance of increasing better toilet flushing power.

Getting rid of slow flushing power is tough. Increasing it will improve the way your toilet disposes of human waste as well. It’s even possible to help with some light clogging problems with your toilet.

How to Increase Toilet Flushing Power

People who look for ways to increase toilet flushing power have toilet problems. Most likely, slow flushing problem.

Therefore, there are 3 common ways to increase toilet flushing power in a safe way. There are absolutely no problems. No problems could occur due to increasing the toilet flushing power.

First Way

The first way would be to unclog your toilet properly. Even if your toilet isn’t clogged and you don’t experience clogging that often – you should still do it. You can consider it to be one part of maintenance as well. You should do it at least twice a year. However, if you are experiencing clogging problems – you should do it more often.

If plunge isn’t good enough, don’t worry. You should definitely look for plumber’s snake. That tool goes deep down the toilet bowl and unclogs further problems. It doesn’t use any pressure at all.

Second Way

The second way to increase toilet flushing power is to increase the toilet water volume. By increasing water level, you will also increase the pressure. And the amount of water that is used to flush and dispose of your waste. The more pressure your water flushing creates, the more powerful it is. It’s simple to understand, and even simpler to do.

To increase the water volume, you should lift up the cover of your toilet water tank. In there, you will find a rod attached to both important parts of the water tank mechanism. On one way, you will find that there are different levels to attach the rod too. By attaching rod higher, you will receive larger water volume.

Other than that, there’s nothing else you are able to adjust to the water tank.

Third Way

The last, yet not the least important way to increase the toilet flushing power is to decalcify your toilet with acidic cleaner. Especially if your toilet is older one. This is important and should be done a few times per year.

Tap water is full of minerals. Toilet bowl is constantly in contact with water. Therefore, a lot of calcium can build down the toilet bowl.

Acidic cleaner and plumber’s snake are the best ways. It can easily help you unclog and remove calcium buildups. You should decalcify your toilet, if you haven’t done it in a while. Large buildups will continue to clog your toilet every day.

You can also watch below video to sum up the above knowledge

Conclusion

I hope that you now understand how to increase toilet flushing power. Also you shouldn’t be afraid to take action on it.

You don’t need to have any experience in DIY, and you also don’t need to know much about toilets. With the access to the internet, you will be able to find useful posts just like this one. Anything you need, it’s most likely that we have it on our website, ready for you.

It’s always better to give it a try and see whether it works. Spending money on your local plumber and on new toilet or parts isn’t the best solution.


Filed Under: Blog, How to

How Much Water to Flush a Toilet

May 23, 2018 By Mark Benett

how much water to flush a toilet
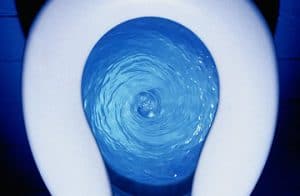
Toilets are made of three main parts. They were used a long time ago almost the same way they’re used nowadays in the modern age.

However, we made toilets automated, for example, flushing toilet water with a press of a button. But how much water is actually necessary to flush your toilet?

If you are using too much water, your water bill will increase. Make sure you aren’t lacking water during the flushing your toilet. If you do, your toilet won’t be flushed properly.

There are many things that should be considered. While toilets work on the same principle, they differ from model to model most of the time.

Why Does Water Level Matter When Flushing a Toilet

Other than static parts, water is also very beneficial to our toilet. Without water, we won’t be possible to flush our toilets.

Without flushing our toilets on regular basis, we wouldn’t be able to dispose of our waste.

The way toilet work, and parts it consists of have a role in water level. However, if not, there’s a simple way to explain it.

If you pour a cup of water into the toilet bowl, you will notice that nothing happens. However, if you pour a gallon of water in the toilet bowl, you will notice the same motion. It’s the same motion of the toilet bowl release valve.It happens when the toilet is actually flushed.

That means that if you don’t have at least a gallon of water, your toilet won’t be able to flush properly. If your toilet water tank is lacking in water, it’s not enough to open the toilet bowl release valve.

How Much Water to Flush a Toilet

There is a very common question; how much water to flush a toilet is actually necessary?

It’s something that might help you decrease your water bill. However, it might also save you from having problems with your toilet.

Earlier, I have mentioned that toilets work on the same principle. But they differ from model to model most of the time. We are still able to approximately know one thing. That is how much water is necessary for every toilet out there.

More than 47% of water use happens in the bathroom, especially using the toilet. So it’s the right place to cut your water bill if that’s your main purpose.

Most of the toilets use approximately around 1.5 gallons of water for each toilet flush. Modern toilet water tanks have the ability for the user to adjust the water capacity of each flush. While for some users it’s more or less than 1.5 gallons of water, 1.5 is probably the average number.

If you are unaware of being able to have a role in deciding how much water does your toilet uses, it’s now time to find that out.

How to Change the Level of Toilet Tank Water

Did you ever think about the way toilet uses water for each flush? If you have ever tried to save some money by cutting the bills down, did you start with water bill?

With each toilet flush, you are able to save some water. We all use the toilet on daily basis, and we can easily say that we depend on the toilet. Therefore, savings can be surprising for some people. Especially if you have a large family.

Locate The Mechanism

All modern toilet water tanks come with the simple standard mechanism inside it. However, they all now have one simple option. You are able to adjust the water level rod which decided how much water is there going to be in the tank.

Find Level Setting

There are usually 3 or 4 different water level settings. Setting it up right could save you from trouble or from the excessive waste of water.

To change the level of toilet tank water, you should lift up the top of the water tank. Don’t feel overwhelmed when you see the mechanism inside.

Find The Moving Level Rod

Simply locate the moving part.It regulates how much water is going to be filled in the water tank before it’s released. If you are having a hard time finding the right part, feel free to flush a toilet. Mechanism of the water tank isn’t complicated and is simple to understand once you see it work.

Re-attach The Level Rod To Available Space

The water capacity leveler will most likely have a few spaces where you can attach it. The higher you attach the water capacity rod, the more water you will have in your water tank and vice versa.

If you decide to put the water level to the lowest setting, here’s what to do. Make sure to test if it’s enough of water for your toilet bowl to flush. You don’t want to flush twice until the human waste is disposed of.

You can watch below video for better understanding on how to adjust the flush water level on a modern toilet system

Things to Avoid When Adjusting The Water Level

There are a few things you should avoid when adjusting the water level of your toilet water tank.

Don’t Use Unreliable Techniques

When there wasn’t option to adjust the water level in your toilet water tank, it was different. People have used different techniques to manipulate the water level. One of the most common old techniques was this. To waste less water through your toilet water tank was to place a brick inside the water tank.

Brick would take the space and less water would be used to fill until the water level rod reaches its top.

Don’t Try Changing The Mechanism Settings

Something you shouldn’t definitely do is to try and mess with the water level rod. When I say try and mess with it, I mean in a bad way. Don’t try to manipulate the mechanism. Creating your own extensions or removing any parts is dangerous. That could end up in disaster.

Conclusion

The water tank is a simple yet very efficient part of our toilet that we depend on a daily basis. However, wasting too much water isn’t a good solution.

I hope that you know how much water approximately is necessary. I would also recommend you to give setting a different water level a try. And see if you could save some money on your water bill.

However, don’t test the limits, and be careful when dealing with water tank mechanism.

How much water do you spend monthly for flushing your toilet?

Filed Under: Blog, How to, Toilet, Uncategorized

How to Fix a Toilet Flusher

May 11, 2018 By Mark Benett

how to fix a toilet flusher
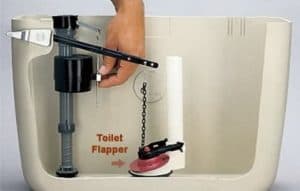
Every time when something you use on regular basis breaks, it’s a game of time to get it fixed as soon as possible.

Bathroom appliances are very important to our life. We depend on them, and we use them daily. But do you need to call your local plumber if something breaks or jams?

Absolutely not. You don’t need to be a genius to understand how a toilet works. Understanding the parts of a toilet is enough of knowledge to be able to fix something.

Toilet flusher is part of a toilet that we use daily. But, it’s a product that is replaceable. Learning how to fix a toilet flusher is useful, and can help you anytime.

What is a Toilet Flusher?

Toilet flusher is a part of the toilet which helps us to get water in the toilet bowl. It’s located in the water tank. Its main role is to release the water whenever we want to.

With a simple push of a button, we activate toilet flusher. It will always release the water that is being held in the water tank. The water in the tank helps us dispose of human waste in the bowl.

Toilet flusher is part of the toilet mechanism. Therefore, since it’s located in the water tank, it’s most of the time located in the water.

It’s made from a durable plastic or PVC material; however, everything has its life expectancy. Still, there are situations where toilet flusher can’t perform as it did when it was brand new.

No flusher out there is the same. That’s mostly due to many different manufacturers. Although, you can be sure that every toilet flusher has the same role in the water tank system.

Toilet flushers are activated by button, or by a handlebar – if it’s unreachable to the height location.

Parts of a Toilet Flusher

Toilet flusher is part of a water tank mechanism. Therefore, it has to be in sync with other parts of water tank mechanism in order to perform well.

Parts of a toiler flusher are:

  • Push button leveler
  • Ballcock
  • Float rod
  • Float ball
  • Flush valve
  • Tank hardware

Push Button Leveler

Everyone is familiar with a push button leveler. It’s the button or a handlebar we press or pull whenever we want to flush the toilet. It’s a button that activates all the parts inside the water tank mechanism.

Ballcock

The ballcock is a key part of the water tank mechanism. It refills the water tank, and it keeps it from overfilling. It’s connected to the water source. It supplies the water tank with water through ballcock.

Float Rod

Float rod is a piece that connects the ballcock and float ball. Its job is to help ballcock know when the water tank is full. Therefore, ballcock will close the valve and won’t overfill the water tank.

Float Ball

Float ball’s job is too simple. It’s a light ball filled with air that floats on top of the water in the tank. As it goes up, it moves the float rod that closes the ballcock valve.

Flush Valve

The flush valve connects to a push button leveler. Once you press the push button leveler, flush valve opens. That way, the water knows when to flush the toilet bowl and dispose of your human waste.

Tank Hardware

Tank hardware will help you to attach the water tank to the wall and keep it safe from moving or falling off.

How to Fix a Toilet Flusher?

Let’s face it – toilet flusher can break from time to time. It’s a product that has a key part in the toilet system. However, it has its life expectancy.

Most of the time, toilet flusher can be fixed. As mentioned above, anyone who understands the parts of the toilet can fix it as well. There is no need to call your plumber for every problem that occurs.

Toilet water tank is full of moving parts. And moving parts can often wear out or get broken. Sometimes, they even can start acting weird without being actually broken.

Before fixing a toilet flusher, it’s important that you find the problem first. Finding out what is the problem isn’t complicated at all.

Look Out for Leaks

First, look out for any leaks. Once you find any leaking, you’ll easily understand what’s causing the problem. The solution depends on what’s causing the problem.

Lift off the Tank Cover

However, if you don’t find any leaks, you should lift off the tank cover. Get an eye on the toilet mechanism and hopefully find what’s causing the problem.

Now you understand the water tank mechanism parts. It’s going to be easy to guide yourself when you’re looking at the toilet mechanism.

Look Inside the water tank

To determine what’s causing the problem inside the water tank, you have to look. You should look at the flush valve first. Try adjusting the float rod and ball. It will fix your problem in case it was leaking or not getting the right amount of water.

Reattaching the flush valve

If the problem is leaking water in the toilet bowl, you should definitely have a look at the flush valve. If it’s not closed properly, water will leak. Solution would be to try and close the flush valve yourself with hand. If that works, you will have to find a way to keep it completely closed. Reattaching the flush valve can help.

Can Toilet Flusher Be Replaced?

If you can’t find your way of fixing the toilet flusher, there’s another option. Most of the parts inside the water tank, including the toilet flusher parts, can be replaced.

Instead of buying a completely new water tank, you can buy the mechanism. Just the part which is causing the problem. It will save you more time and money.

Replacing parts is useful when you know what the problem is, however, you can’t fix it. For example, if float rod gets broken.

You can watch below video for your better understanding

Conclusion

Fixing your toilet flusher isn’t complicated as many people think it is. However, you need to learn how a toilet works and learn the parts inside.

You don’t need to be a genius, but some interest in learning how to fix a problem is needed.

Everything you need to know is in this post. However, keep in mind that some manufacturers might change the parts.

It might take some time to get used to a different water tank. But mechanism in there is simple and straightforward. It has only one job to do.


Filed Under: Blog, How to

« Previous Page
Next Page »

Primary Sidebar

16 Boho Farmhouse Living Room for Eclectic Comfort

November 19, 2025

16 Boho Farmhouse Bedroom for Cozy Retreats

November 19, 2025

17 Low Maintenance Bathroom for Functional Style

November 19, 2025

19 Fall Tray Decor Ideas for Stylish Displays

November 19, 2025

18 Organic Modern Bathroom for Natural Comfort

November 19, 2025

Forget flushing the toilet without handle, if you ever consider buying new toilet, please consider buying this amazing toilet

TOTO CST454CEFG#03 Drake II Two-Piece Elongated 1.28 GPF Universal Height Toilet with CEFIONTECT, Bone
Buy on Amazon